Ultimate Guitar Setup Guide By Zager Guitars

Prepare to embark on a thrilling guitar adventure as we unveil the captivating world of guitar setups! This isn’t your average maintenance procedure; it’s a wild ride that will have you hooked from the first strum.
Picture your guitar as a rock star, ready to unleash its full potential on the stage. But just like any diva, it needs a little T.L.C. to shine its brightest. That’s where the mystical art of a setup comes in. It’s like giving your guitar a spa day, complete with pampering, fine-tuning, and a touch of magic.
The guitar wizard (a professional) performs enchanting procedures during a setup. They delicately adjust each fret, string, and nut, turning your ordinary guitar into a finely-tuned instrument of pure awesomeness. It’s like a makeover that transforms your guitar into a superhero, ready to conquer any riff or solo you throw.
But wait, there’s more! A setup isn’t just about making your guitar play better—it’s about foreseeing and banishing potential problems before they crash your jam session. It’s like having a psychic guitar doctor who can predict the future and prevent lurking issues. Now that’s some severe guitar sorcery!
You might be tempted to grab your toolbox and embark on a D.I.Y. setup adventure. And hey, kudos to you for being brave! But remember, even the mightiest heroes sometimes seek the guidance of a master. Consider entrusting your six-stringed companion to a professional setup magician who can work their mystical mojo with precision and finesse.
Prepare yourself for the ultimate guitar setup guide, where we reveal the 12 essential steps that mirror those performed by professional repair shops. We’ll walk you through each procedure, highlighting the required tools and providing detailed instructions.
Let’s dive into this comprehensive journey of guitar setup mastery, where you’ll gain the knowledge and skills to bring your instrument to its optimal state. Get ready to unleash your inner guitar technician as we embark on this exciting adventure together!
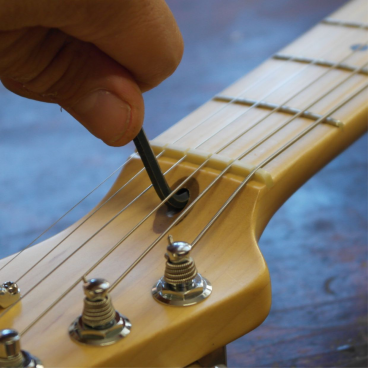
Truss Rod Adjustment

Today we uncover the hidden secrets of the adjustable truss rod—a mystical component that holds the power to shape the destiny of your guitar’s neck!
Now picture it as a mighty warrior, locked in an eternal battle against the tension of the strings, striving to maintain the perfect balance between straightness and curvature.
The truss rod is a game-changer in guitars, found in almost every acoustic and electric steel-string model made since the funky ’70s. It’s like a superhero that swoops in to save the day, counteracting the string tension and keeping the neck in check. Loosen it, and your guitar transforms into a bow-wielding archer, with higher action and greater string-to-fretboard distance. Tighten it, and the channel defies gravity, bending backward and bringing all the strings closer to the fretboard.
Now, where does this adjustable wonder lurk? On electric guitars, it often hides beneath the truss-rod cover on the headstock or at the body end of a bolt-on neck. Acoustic guitars, on the other hand, like to keep it mysterious, concealing the truss rod within their body, near the sacred neck-body joint. Ah, the secrets they hold!
But fear not! To embark on this journey, you’ll need a trusty small Phillips-head screwdriver to unveil the truss-rod cover and an appropriate hex key or wrench (usually supplied with a new guitar) to wield your power over the truss rod nut clockwise. However, be warned! Bolt-neck guitars with hidden nuts may require extra expertise—a neck removal, a surrogate body, and a neck jig. It’s a challenge best left to the masters of the craft—the pro shops!
Let’s unveil the ancient technique to master the truss rod’s power. Tune your guitar and string it up, ready for battle. Press one of each low e-string at both the 1st fret and a fret near the neck-body joint, forming a straight line between them. Doing so eliminates the interference of the nut and bridge—those mischievous mischief-makers of action. It’s a decisive move that allows you to command the neck’s destiny!
With its power in your hands, you hold the key to shaping your guitar’s playability, bringing harmony to the neck and strings. So, embrace the challenge, and may your guitar’s neck remain straight or gracefully curved as you embark on this thrilling quest!
cc: MarconiLAB
Now let’s discuss the tango dance between the guitar neck and the strings!
A tiny gap holds the key to achieving the perfect balance. Imagine a slender piece of paper or a trusty business card, just slim enough for open string to slip through. When perfectly straight, this little space should exist between the string and the frets at the middle of the neck.
But beware, for if the neck has too much bow or relief, that gap widens, throwing our equilibrium off balance. Fear not, for the truss rod is here to save the day! If the hole is wider due to excessive bow neck relief, it’s time to tighten the truss rod. On the other hand, if the neck is back bowed and the strings lie flat against the frets like a mischievous trickster, loosening the truss rod is the remedy.
Now, how do the masters of the craft assess this delicate situation? An experienced repair tech might have a few tricks up their sleeve. They may gaze down the neck like a wise sage, taking in its essence with a practiced eye. Or perhaps they’ll employ a straightedge, a trusty ally that unveils the precise measurement of the neck bow. These experts know precision is critical when adjusting the guitar’s truss rod.
When it’s time to take matters into your own hands, tread carefully, and adjust the break angle of the truss rod with gentle increments, like a whisper in the wind; give it a quarter turn, checking the relief frequently to ensure you’re on the right path. And remember, use as little torque as possible, for we seek harmony, not excessive force.
Now, let’s gauge your D.I.Y. spirit! Add a star to your cosmic guitar rating if you possess the confidence and mechanical prowess or have witnessed the mystical adjustment performed by a professional. Subtract a star if the thought of tampering with your precious instrument sends shivers down your spine, and take away another lead if you own a bolt-neck guitar with concealed nuts—an extra challenge for the brave-hearted.
So, my brave guitarist, with these insights in hand, you’re now equipped to dance with the truss rod and restore the perfect equilibrium between the neck and the strings. May your adjustments be precise, and your guitar sing in sweet harmony as you navigate this thrilling adventure of D.I.Y. mastery!
Bridge Height Adjustment
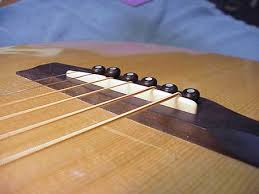
cc: frets.com
Let’s explore the fascinating world of bridge adjustments, where the magic happens to fine-tune your guitar’s action! Whether you wield an electric or an acoustic guitar, the bridge is critical to unlocking the perfect string height. It’s time to embark on this thrilling journey of precision and craftsmanship.
Assemble your tools for this adventure: a trusty machinist rule for bass guitars, a trusty screwdriver or hex-key for electric guitars, calipers for accurate measurements and acoustic guitars, a shim stock or a stationary belt sander for potential bridge saddle adjustments.
Now, let’s delve into the process. The bridge takes center stage once you’ve skillfully tweaked the truss rod. On an electric guitar, it’s as simple as twisting the appropriate screws to raise or lower the bridge’s height. On the other hand, most acoustic guitars may require some finesse. You might be shimmying or sanding the bridge saddle to achieve the desired results. But remember, if you’re not experienced with this delicate modification on an acoustic guitar, it’s best to leave it in the capable hands of the pros.
To measure the action, reach for your trusty machinist’s rule. Your guide is the distance between the string and the top of the 12th fret. For the treble side (the string radius the top three lines), a low action would be around 3/64ths of an inch. As for the bass side, 4/64ths or 5/64ths of an inch would be considered low. If you double those numbers, you’ll land in moderately high action. The choice, brave guitarist, is yours to find the sweet spot that suits your playing style.
Once the truss rod and bridge adjustments are complete, it’s time for the ultimate test: the guitar’s tone. Strum those strings and listen closely. Let the clear, vibrant tones resonate through your being, bringing joy and satisfaction to your musical soul.
Now, armed with your guitar-playing knowledge of bridge adjustments, go forth and conquer the realm of guitar setup. May your strings sing with clarity and your fingers dance effortlessly along the fretboard. Embrace the power to shape your instrument’s action, and let the music flow with pure brilliance!
Check Electronics
Are your switches making unexpected sounds? Does it seem like you’re frying up a batch of crispy bacon every time you perform a volume swell? Fear not; a complete guitar setup also includes tending to the vital realm of electronics. Whether you wield an amplified acoustic beauty or an electric guitar with active pickups, it’s time to ensure your electronics are pristine. Let’s dive into this electronic odyssey!
Equip yourself with the necessary tools: electronic contact cleaner from your friendly neighborhood electronics store, a collection of screwdrivers, and a trusty socket wrench or adjustable open-end wrench.
Now, let’s get down to business. Removing the plastic cavity plate on the back of the neck and pickup your guitar, unveiling the inner workings. Plug in your instrument and listen closely for the source of those annoying noises. You might need to venture beneath the pickguard on some guitars to access the guts, but you can reveal the culprit with a gentle touch.
Armed with the can of contact cleaner and its handy nozzle extension, spritz any point where dirt or oxidation might be causing a noisy connection. Direct your magical mist towards the volume and tone pots at their openings, next to the solder lugs, and onto all switches. Embrace the ritual of flicking each switch rapidly or twisting each knob back and forth, allowing the cleaner to work wonders. Then, engage in a musical session, listening carefully for any lingering noises. Repeat the process as needed until tranquility is restored.
And let’s not forget the humble nine-volt battery! Test its vitality with the age-old tongue test—gently place its terminals on your tongue and see if there’s a delightful tingle. If so, your battery is in good shape, ready to power your musical endeavors.
Embrace the D.I.Y. spirit, my friend, as you venture into guitar electronics. With a sprinkle of contact cleaner and a keen ear for disturbing noises, you can master this task. Just remember, avoid spraying the cleanser in your eyes—the joy of setup should not come at the expense of your vision!
So go forth, fearless troubadour, and tame the electronic beasts within your guitar. May your switches snap, crackle, and pop with musical brilliance, and your instrument sing with clarity and purity. Embrace the power to conquer the realm of guitar electronics, and let your music soar to new heights!
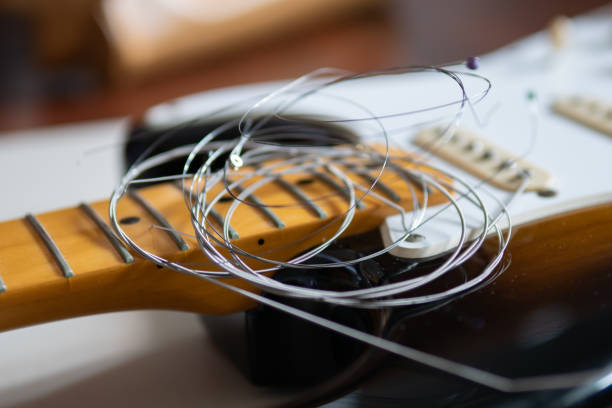
Change the Strings

Before diving into the mystical world of string changes, it’s important to note that all the adjustments we’ve discussed thus far should be made before swapping out your old strings. The truss rod, bridge height, and nut slots are best tackled before the new lines take their place. Think of it like having two strings sets—one for adjustments and one for playing.
Now, let’s gather the necessary tools for this string-changing adventure: heavy-duty wire cutters to trim excess string length or simply your nimble fingers to wind the excessive length high e string into clean coils.
The process varies depending on your guitar type. For most electric guitars and some acoustics, the strings slip through the bridge or tailpiece, held in place by the tension of the fret wire and ball end. Steel-string acoustics often use bridge pins to secure the strings, requiring two crucial steps: 1) aligning the slot in the bridge pin with the string and 2) pulling up on the string as you push down on the bridge pin. Nylon-string guitars, on the other hand, involve a more intricate process. The string must be brought through the bridge, looped around, and woven in an under-and-over knot. It’s a delicate dance of strings!
Once you’ve mastered the art of string placement, it’s time to pass the string through the tuning post, leaving about an inch of slack. Hold the “speaking length” of the line tightly, and bring the loose end around the bar in the opposite direction of how it will wrap around when tightened. Wrap it snugly beneath the speaking length, then guide the free end over and around the speaking length, giving it a firm downward tug. Slowly bring the string to pitch, letting the music resonate through your fingertips. Finally, trim the excess string length with wire cutters or create neat coils for a tidy appearance.
As your guitar approaches pitch perfection, give each string a gentle tug along its entire length, from the tuners to the nuts and from the bridge saddle to the tailpiece. Embrace the satisfying bends by performing a series of whole- and half-step bends along each string’s length. With these techniques, steel-string acoustics and electrics will settle within 20 cents of their correct pitch. With their unique characteristics, nylon-string guitars may require one or two additional tunings over a few hours before finding their harmonic equilibrium.
Fear not, my brave guitarist, for the D.I.Y. factor is strong in this endeavor. With some practice, you’ll quickly learn the ropes and master the art of string changes. So grab your trusty tools, embrace the musical ritual, and let your strings sing with sweet harmony. Enjoy the journey of tuning and refining, and may your guitar always find its way to the perfect pitch!
Tuning Hardware

When your strings are tension-free, you might be surprised to discover more loose nuts and screws than you’d expect to find in a whimsical mix of a funny farm and a bustling whorehouse. But fear not! We shall restore order to this mechanical chaos.
Prepare your trusty toolkit, including small screwdrivers, an adjustable open-end or socket wrench, and a bottle of 3-in-1 oil.
Now, let’s get hands-on! Give those loose parts a gentle wiggle, letting them settle into their rightful positions. Most tuners feature a nut on the front of the headstock and a small screw on the back. Use the appropriate size screwdriver to gently tighten these screws and bring stability back to tuning machines into their lives.
Keep an eye out for a tiny screw on the crown of the tuning button (not every tuner will have one). Adjust its tightness to fine-tune the tension of the tuner itself.
Add a drop of light oil to each mechanism for guitars with open-gear tuners—those delightful tuners where you can witness the mesmerizing gears. Closed-gear tuners can also benefit from a drop of oil down the tuner shaft. Remember, a little lubrication goes a long way in keeping these components in top shape.
Embrace the D.I.Y. spirit, my friend, and approach this task gently. These delicate, fine-threaded parts can be easily damaged with excessive force. So, be kind to them, avoiding extreme wrist or arm pressure torque.
With your toolkit and newfound expertise, you’ll restore order to tuners. Tighten, adjust, and oil carefully, and witness the transformation as your guitar returns to its former glory. May your tuners be firm, your strings in perfect harmony, and your musical journey full of joy and satisfaction!
Clean and Polish the Frets
Ah, behold the wonders of cleaning and polishing! Your guitar will undergo a transformative makeover in five minutes, emerging as a shining beacon of musical brilliance. This step may not involve significant fret surgery like a “crown and polish,” but it’s the essential housecleaning your instrument deserves.
To embark on this journey, arm yourself with a trusty metal polish, such as the legendary Nevr-Dull, and grab a handful of paper towels. Here’s a vital tip: avoid abrasive polishes like automotive buffing compounds or steel wool unless you possess the mystical knowledge of fret care.
Now, let the magic unfold. Crack open that can of metal polish and extract a small wad of the chemically impregnated fibrous cloth. With a stroke of finesse, rub across each fret and witness the dullness vanish like a fading dream. Breathe life into the frets, my friend, as you restore their lustrous glory. And fear not the excess polish, for a quick swipe with a paper towel or rag shall banish it from sight.
Embrace the D.I.Y. factor I bestow upon you with four shining stars. If you can wipe your nose, you have the prowess to polish your frets. It’s a simple task, yet its impact is mighty. So, wield that metal polish with pride and revel in the transformation of your guitar into a work of art.
Remember, my friend, a clean and polished guitar is not merely a sight to behold but a joy to play. Let your frets shine, and may your musical journey be filled with brilliance and awe-inspiring melodies!
Cleaning Fretboards
Ah, the art of guitar housecleaning continues! Just like the delightful task of polishing frets, what lies ahead is an easy-to-do endeavor that will bring renewed life to new strings on your beloved instrument.
Prepare your arsenal of cleaning tools: lemon oil or light wood oil, a trusty bottle of Windex, a soft cotton rag, and your choice of weaponry—a guitar pick or a trusty Popsicle stick.
Suppose your frets and fretboard find themselves in the clutches of severe filth; fear not! Begin by unleashing the power of Windex upon the grimiest of dirt and grease. Let it work its magic, dissolving away the accumulated muck. Wield a guitar pick or a sharpened Popsicle stick with finesse to tackle the stubborn grime that clings to the frets and lurks beneath each string. Dislodge the dirt, reclaiming the fretboard’s pristine nature.
But our journey does not end there! With a gentle touch, apply a light coat of lemon oil, nourishing the fretboard and restoring its natural beauty. Take a moment to appreciate the transformation. Then, with a diligent sweep, wipe away any excess oil with a trusty paper towel.
Oh, and let us not forget the humble acoustic guitar with its unfinished wood bridge—a beauty in its own right. Please treat it carefully, my friend, and occasionally apply oil to keep it in splendid condition.
Embrace the ease of this housecleaning-level work, for it is a task that anyone can conquer. Armed with lemon oil, Windex, and trusted cleaning companions, you shall witness the rebirth of your guitar’s frets and fretboard. May they shine with brilliance and radiate the joy of music as your fingers dance upon them.
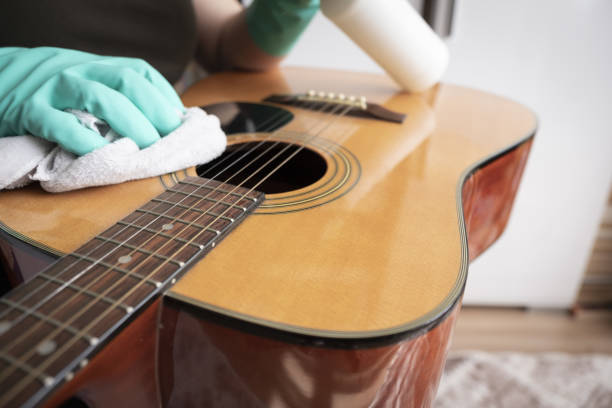
Clean and Polish

cc: Windex
And now, my fellow guitar enthusiast, we arrive at the grand finale—the finishing touch that completes the transformation of your instrument. A clean and polished guitar beckons to be embraced, strummed, and plucked, for it yearns to unleash its melodic potential.
Prepare for this glorious moment with your trusty tools: a soft cotton or chamois cloth, the coveted guitar polish, and the mighty Windex.
Suppose your guitar has succumbed to major filth; fear not! The magical powers of Windex shall come to your aid, banishing the stubborn grime that dares to tarnish your instrument’s glory. Please give it a gentle spritz and witness the wonders unfold.
Now, it’s time to bring out the true shine. Grasp your favorite guitar polish and embark on a journey of rejuvenation. Remember, a little goes a long way. A spritz or two into your cloth shall suffice to conquer each significant surface of your beloved guitar. But exercise caution, dear friend—avoid the fretboard unless it boasts a lacquered finish, and keep the polish away from movable parts.
With diligence and care, let your cloth glide across the guitar’s body, unveiling its lustrous beauty. Behold as it glistens under the light, reflecting your passion for music and dedication to your craft.
Embrace the D.I.Y. factor of this endeavor, for cleanliness, is indeed next to rock godliness. Your guitar shall be a testament to your commitment, ready to be embraced and played with renewed vigor. Let your music soar, guided by the harmonious synergy between your fingers and the new instrument in your hands.
FAQs
What Does a Guitar Setup Include?
The traditional guitar setup varies depending on the size of pickup height, angle of action, string angle, string length, saddle height, and bridge angle.
How Much Should I Pay For Guitar Setup?
A typical configuration will cost around $5 to $100. If repair work has been done, it will increase the cost of your instruments. If a guitar technician is adjusting string heights, you should make a good decision.
Can You Do Your Guitar Setup?
You’ll probably want to change the strings and make minor adjustments if you like. Depending on the tool you have and the time required, you could make some money in the long term if you did this yourself.